How to update the firmware on your PhobGCC controller
As of September 2022, the only “official” way to flash new firmware onto a Phob is by setting up the entire programming environment used by PhobGCC developers. If this sounds like something you’re interested in, check out the walkthrough.
For the rest of us, there’s a much easier method as long as your controller uses a 1.2.X board and a Teensy 4.0. If you’ve purchased a Phob from Vulpine Customs at any point, this is the hardware you have. If you’re not sure, ask the person who built your controller before proceeding.
Tools
You will need a tri-point or Microstix screwdriver to open your controller. If you don’t have one, I recommend this one from Battle Beaver (cheaper) or this one from Wera (nicer).
You will also need a micro-USB cable to connect your controller to your computer. This must be a data transfer cable and not simply a power cable. If you don’t have one, I recommend this one because the shape of the plug makes it particularly easy to connect to the Phob.
Downloads
Download and unzip this bundle, which contains a precompiled HEX binary (the firmware you will be flashing onto your controller) and the Teensy Loader application for both Windows and Mac (the app you will use to do it):
PhobGCC 0.27 for Phob 1.2.X boards and Teensy 4.0
Note that this binary is specific to PhobGCC builds with 1.2.X boards and a Teensy 4.0. You take full responsibility for what happens if you try to flash this binary onto any controller not matching these specifications.
The process
Prepare the new firmware
On your computer, open the Teensy Loader application. Use teensy.exe if you’re on Windows, or Teensy.app on MacOS. You should see a very small window appear.
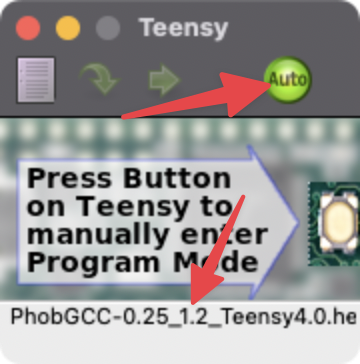
Press the green Auto button in the window’s toolbar so that it lights up. Then grab the HEX file from the folder you downloaded and drop it onto this window. You should see the name of the file appear at the bottom of the window.
Open your controller
Start by unplugging your controller and opening the shell. Take note of how everything fits together, because you’ll be reassembling it in a few minutes.
Use your screwdriver to unscrew the 6 screws on the back of the controller. Holding the controller face down, remove the back shell and set it aside. Then carefully remove the motherboard from the front shell by gently prying the cable from the post where it’s looped and lifting the board free. Leave the buttons face down in the front shell and set it aside.
Plug in the USB cable
Flip the board over and you will see the Teensy in the center with a micro-USB port on its right edge. Make absolutely sure the controller’s main cable is disconnected, then plug your micro-USB cable into the Teensy and your computer.
Flash the firmware
Press the small button on the front of the Teensy. A red light may appear near the USB connector, and you should see the Teensy Loader upload the new firmware and then display the text “Reboot OK”. This should only take a couple of seconds.
If nothing happens, unplug and replug the cable and make sure the green Auto option is lit up, then try again. If it still doesn’t work, try another cable. Some micro-USB cables only carry power and not data, so swap to a different cable until you find one that works, or order the recommended one above.
Reassemble your controller
Your controller now has the latest firmware! Unplug the USB cable and start putting it back together in reverse order. Make sure the cable loop is seated exactly how you found it so that the shell closes properly. Do not force the shell closed. If it’s not sitting flush, make sure all the button contact pads are seated correctly, the trigger sliders are all the way up, and the cable is aligned with the exit hole. Finish up by reinstalling the 6 screws on the back shell. Do not overtighten them; the posts they screw into tend to strip easily, so be gentle.
Test it out
Plug the controller into your console or adapter, launch a game, and press B to activate the sticks as usual. Make sure the analog sticks, triggers and buttons all work normally. If so, you’re ready to play!
Depending on which firmware version you upgraded from, you may want to test for snapback, since the built-in snapback filter has changed slightly over time. The best way to do this is using Smashscope, which will show you snapback waveforms to help inform any adjustments to the filter. Set it up and watch the video to learn how to use it, and then follow the PhobGCC calibration guide to adjust the snapback filter as necessary.
Troubleshooting
If you run into any issues and you’re a Vulpine Customs customer, message me on Twitter or Etsy for help. Otherwise, check out the PhobGCC documentation — and specifically the Discord server linked there, where you can find lots of people who can help.
Resources
-
PhobGCC documentation hub, including a link to the PhobGCC Discord server.
-
Teensyduino, the standard programming environment for Teensy development.